Behaviour (Step 1)
Page: /behaviour · sidebar behaviour (Step 1)
Use it to: design what your robots do, as behaviour trees, and keep the
files those trees use: environment settings and your own code nodes.
Next step: turn a tree into a task on the Tasks page.
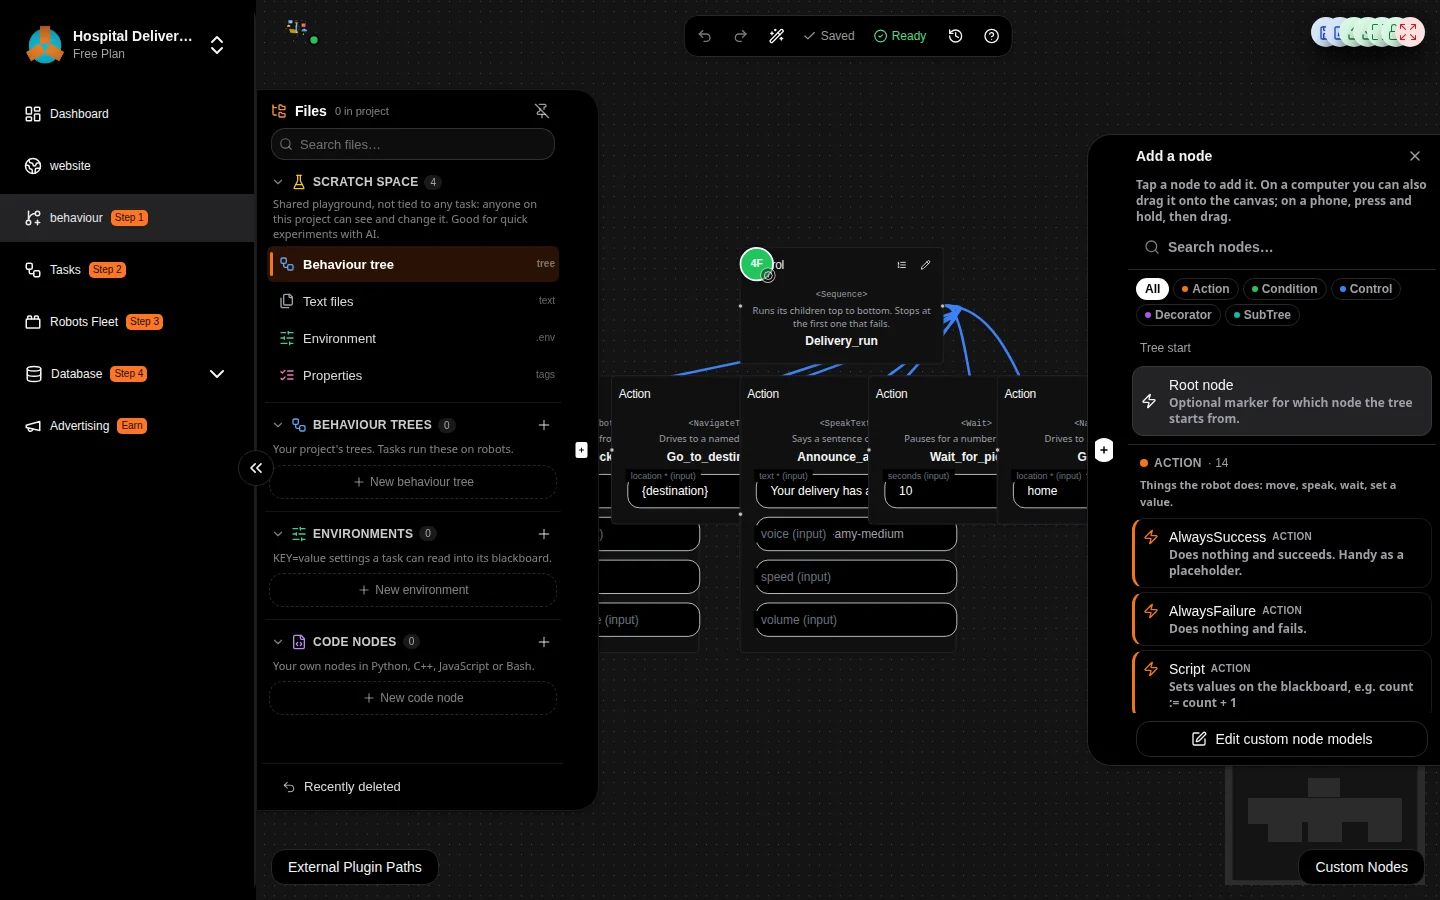
The file manager (left), the canvas with a tree, and the node list (right).
A behaviour tree is a robot’s plan: control nodes decide what runs next, action and condition nodes do one thing each, and every node finishes with success or failure. Behaviour trees on the robot explains every node the robot can run.
The screen
Toolbar (top). Undo and redo, Tidy up (lines the nodes up in run order), the save status (Saved when everything is stored), the problem count (Ready when the tree looks good; click it to see problems such as a node with the wrong number of children), History, and ? for the built-in guide.
File manager (left edge). Hover over the left edge to open it; the pin button keeps it open. It has four sections:
Section |
What it holds |
|---|---|
Scratch Space |
A shared playground for the whole project: one Behaviour tree, plus Text files, an Environment and Properties. Not tied to any task. The scratch tree is also what a task runs when its tree is set to Main. |
Behaviour trees |
Your project’s named trees. Tasks run these on robots. |
Environments |
|
Code nodes |
Your own nodes written in Python, C++, JavaScript or Bash. See Your own nodes below. |
Each file’s ⋮ menu renames, duplicates or deletes it. History and Recently deleted sit at the bottom of the file manager.
Node list (right edge). Every node you can add, grouped as Action, Condition, Control, Decorator and SubTree, with a search box. Nodes marked robot run on XPARO robots; nodes marked preview are placeholders that succeed without moving hardware yet (see Behaviour trees on the robot). Your exposed code nodes appear under Your project’s nodes, and every other tree of the project appears as a ready-made SubTree. More nodes (Nav2, MoveIt) lists nodes that only run on robots with those stacks and a plugin.
Building a tree
Open or create a tree: Behaviour trees → New behaviour tree, type a name and press Enter.
An empty tree shows a welcome card. Start from an example (Greet a visitor, Deliver and come back, Keep trying to arrive, Work, or charge when low) or press Add the first node.
Select a node and tap its + to add a child under it, then pick the node from the list. Children run top to bottom; use a control node’s Reorder children button (or drag) to change the order.
Fill in each node’s ports in its fields. Write
{name}to read a blackboard value; every{name}becomes an input the task fills in.Use a node’s pencil to rename it and set pre-conditions such as
_skipIf=battery < 20.
Everything saves automatically as you edit (Ctrl+S saves at once), and every connected robot receives the new version within seconds.
Keys |
Action |
|---|---|
Ctrl+Z / Ctrl+Shift+Z |
Undo / redo |
Ctrl+D |
Duplicate the selected node |
Ctrl+S |
Save now |
Delete |
Delete the selected node or connection |
A |
Open the node list |
? |
The built-in guide |
On a phone: tap a node in the list to add it, or press and hold, then drag it onto the canvas.
Note
The node edit dialog also has a Postconditions tab (_onSuccess,
_onFailure, _onHalted, _post). These are stored in the XML for
BehaviorTree.CPP and Groot2, but XPARO’s own robot engine does not run them;
only the four pre-conditions are evaluated on XPARO robots.
Environments
An environment is a list of KEY=value lines. Open one and add each key
and value with Add. A synced copy lands on every robot as
custom_envs/custom_maps/<name>.env (see Synced files and folders).
On the Tasks page, map a tree input to From env, pick the file and the key, and the value is filled in when the task runs.
Your own nodes
Code nodes turn your own code into tree nodes:
Code nodes → New code node, type a name without an extension, and pick the language (Python, C++, JavaScript or Bash) in the editor’s top right.
On the Node tab, switch on Expose as a Behavior Tree node, choose Action or Condition, add the ports with + Input / + Output, and press Save node.
Generate template writes starter code for those ports in the chosen language (the Example button on the Source tab previews it). Fill in the logic on the Source tab and press Save.
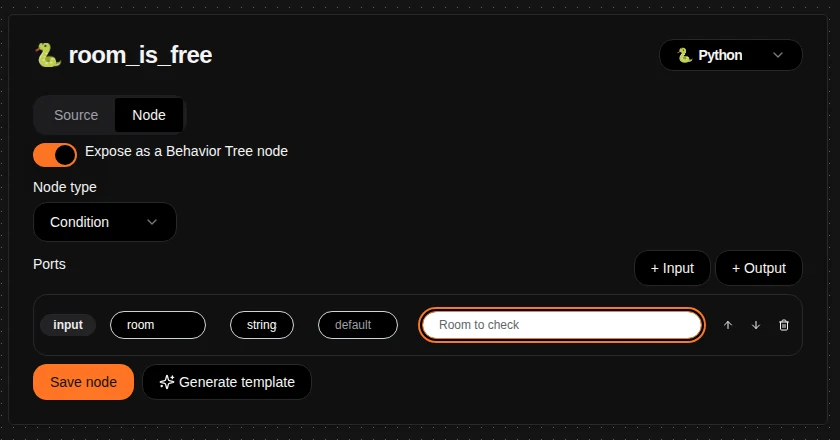
A Python condition node with one input, room.
Saved code nodes are sent to every connected robot, which loads them straight away. If a file cannot be loaded (for example, C++ that does not compile), the dashboard shows a red message naming the file and the reason. The full rules for each language are in Custom nodes.
Important
For a Python node, the tag the robot registers is the XML_TAG in
your class, while trees use the XML tag set in the editor (the
<tag /> field on the Source tab). Keep the two identical, or trees
using the node fail with “isn’t a node this robot knows”. Generate
template sets both for you.
Two more ways to add nodes, at the bottom of the canvas:
- External Plugin Paths
Point XPARO at Python files (or installed Python modules) that are already on your robots’ disks. Every
CustomBTNodeclass in them becomes usable in trees. No code is sent over the network, only the path.- Custom Nodes
Code typed into the dashboard and run by the robot’s engine. Because it runs inside the robot’s XPARO process, it is off by default: a project Owner or Editor must turn it on for the project, and every change is written to an audit log. Code nodes (above) are the usual way to add your own nodes.
Watching a run live
While a task runs on a robot, open its tree here: a banner shows which task is running on which robot, and every node shows its state as it changes (Running, Success, Failure). This works for runs started from the dashboard and from the robot itself.
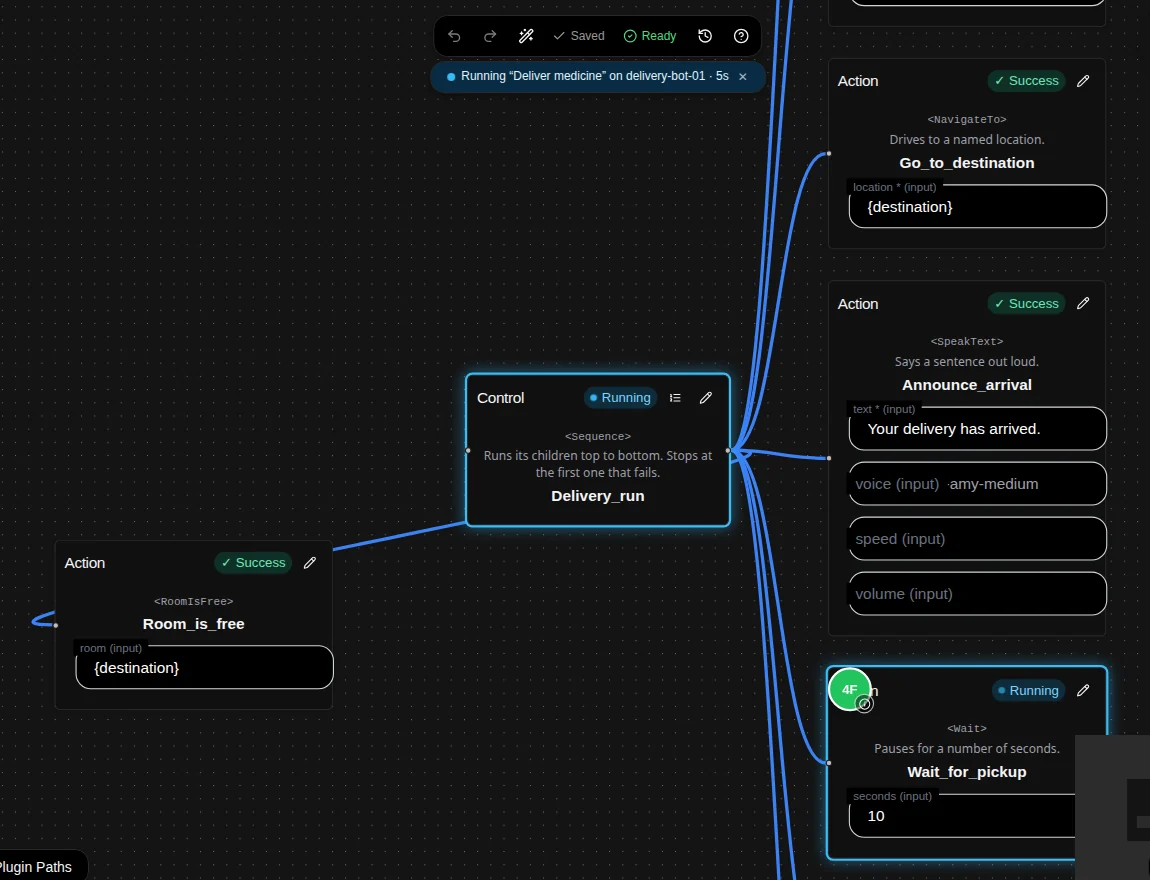
A run in progress: the Sequence and the Wait node are running, the earlier steps have succeeded.
The canvas matches the robot’s updates by node name, so give every node a unique name.
History and recovery
History (toolbar or file manager) lists every saved version of a file with who changed what and when. Open a version to preview it, compare it with the current one and restore it, or put every file back to how it was at a point in time. Recently deleted brings back deleted files. Restoring is a normal save: connected robots receive the restored version.
Working together
Several people can edit the same project at once. Their cursors appear on the canvas, edits from others show up live, and if your copy and the server’s copy of a file both changed, the editor tells you instead of silently overwriting either. Viewers see the trees read-only.
Ask the AI
The chat at the bottom of the page (Ask about, or edit, this behavior tree) can explain the open tree and propose changes. Changes are applied to the canvas and marked Changed by AI; undo them like any other edit. It uses the project’s own LLM key (see Dashboard (project overview)).
Common questions
- My tree saved but the robot runs the old version.
Trees sync to robots that are connected when you save; a robot that was offline gets the latest version when it reconnects. Check the robot is online on Robots Fleet (Step 3).
- A node shows a problem badge.
Hover over it to see why: usually a required input is empty or a control node has the wrong number of children. The robot would refuse such a tree with
invalid_tree(see Run results).
