Install and run
This page installs the xparo ROS 2 package on a robot (or any Ubuntu
computer) and connects it to your project. The steps below were run as
written on a clean ROS 2 Jazzy machine.
What you need
Ubuntu 24.04 with ROS 2 Jazzy and the ROS development tools, installed the normal way (ROS 2 install guide, including
sudo apt install ros-dev-tools). The package is tested on Jazzy; other ROS 2 releases are not tested.Internet access from the robot to
xparo.inover HTTPS (port 443).From the dashboard: your project ID and a secret key (see Quickstart, steps 2 and 3).
1. Install the dependencies
sudo apt update
sudo apt install -y git python3-websocket python3-psutil python3-yaml python3-requests ros-jazzy-py-trees
These are the Python libraries xparo_ros uses (WebSocket client, system
stats, YAML, HTTP) and py_trees, which its behaviour tree engine is built
on. No pip is needed.
2. Get and build the package
The package lives in the xparo_ros2
repository (the ROS package inside it is called xparo). Put it in a
colcon workspace and build it:
mkdir -p ~/xparo_ws/src && cd ~/xparo_ws/src
git clone https://github.com/lazyxcientist/xparo_ros2.git
cd ~/xparo_ws
source /opt/ros/jazzy/setup.bash
colcon build --packages-select xparo
Check it built:
source install/setup.bash
ros2 pkg executables xparo
xparo xparo_c
xparo database.py
xparo xparo_ros
xparo_ros is the node you run. (xparo_c is a small C++ example node
and database.py an internal helper; you don’t need either.)
3. Run it
source ~/xparo_ws/install/setup.bash
ros2 launch xparo xparo_launch.py \
  xparo_project_id:=<your-project-id> \
  xparo_secret_key:=<your-secret-key> \
  xparo_stage:=development
xparo_stage:=development lets the robot run tasks that are still in
development, which is where every new task starts. Leave it out on robots
that should only run production tasks (see Configuration).
Within a few seconds the node prints the XPARO banner and then:
[xparo_ros-1]         \\Connection Sussessfull//
[xparo_ros-1]            \\X.P.A.R.O remote//
[xparo_ros-1]             \\is 🄻🄸🅅🄴 now//
followed by the project data it received. That’s it: open Robots Fleet in the dashboard and the robot is in the list with a green Online dot, named after the computer’s hostname.
Tip
Keep the terminal open: this is the robot’s log. Stop the node with Ctrl+C. The dashboard shows the robot offline once its heartbeats stop, within 90 seconds.
What happened on the first connection
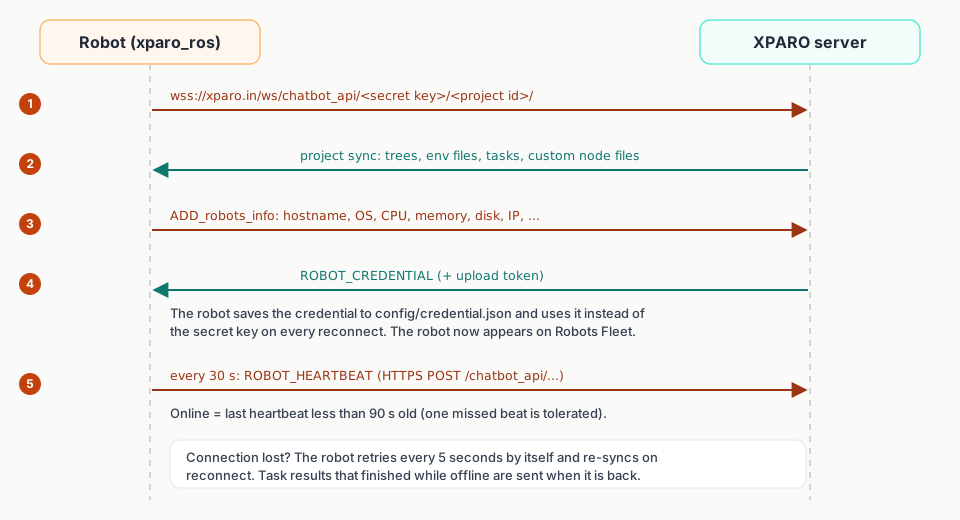
The robot joins with the secret key, receives the project, reports its hardware and gets its own credential.
The robot received its own credential and saved it, so from now on it reconnects with that instead of the secret key. You can keep starting it with the same command.
Messages you may see that are normal
[WARN] nav2_msgs not available. Subscriber will not start.Nav2 isn’t installed, so Nav2’s behaviour tree log isn’t forwarded. Install
ros-jazzy-nav2-msgsif you use Nav2.No rosbag2 recorder is running -- recording controls stay idle until one startsRecording is off. See ROS bag recording to turn it on.
[bt_engine plugin_loader] failed to load '.../custom_node_files/python/greet_example.py': [Errno 2] No such file or directoryThe current version of the package lists example custom nodes whose files are not in the repository. It is harmless: your own custom nodes are not affected.
Optional extras
Install these only for the features that need them:
For |
Install |
|---|---|
Nav2’s behaviour tree shown live on the dashboard |
|
Custom nodes written in C++ |
|
Custom nodes written in JavaScript |
Node.js (the |
Wi-Fi tools on Robots Fleet |
NetworkManager ( |
Bluetooth tools on Robots Fleet |
BlueZ ( |
Showing ads with the native player (Advertising (Earn)) |
A desktop session on the robot’s screen, |
Updating
cd ~/xparo_ws/src/xparo_ros2 && git pull
cd ~/xparo_ws && source /opt/ros/jazzy/setup.bash
colcon build --packages-select xparo
Then restart the node. The saved credential survives a normal rebuild; if you
delete the install folder, the robot simply joins again with
xparo_secret_key and appears as the same robot.
Next steps
Configuration: every launch parameter, with a command builder.
ROS 2 topics: connect your own ROS 2 nodes.
Robots Fleet (Step 3): what you can do with the robot now.
Troubleshooting: if the robot doesn’t show up.
