How XPARO works
This page explains the ideas behind XPARO in plain words. Read it once and every other page will make sense. No ROS 2 or coding knowledge needed.
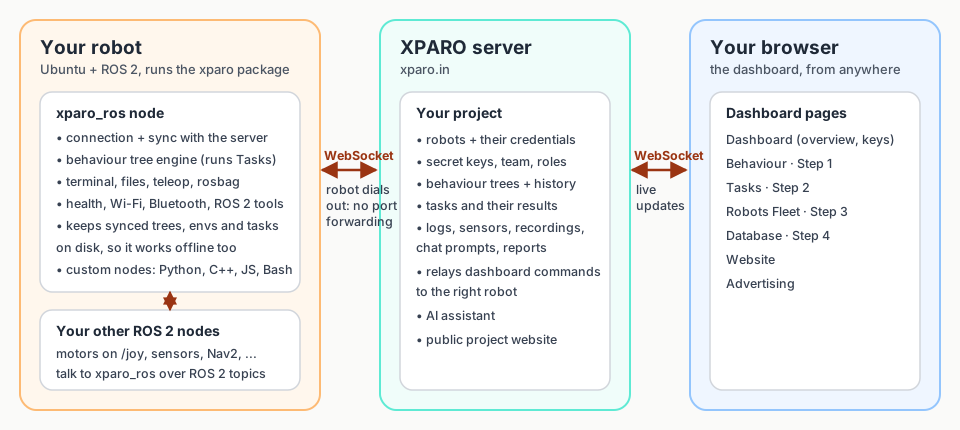
The three parts of XPARO.
The two halves
The xparo package on the robot. A ROS 2 package (repository
xparo_ros2, package name
xparo) whose node, xparo_ros, runs on the robot. It connects to the
XPARO server, receives your behaviour trees and tasks, runs them, and reports
everything back: task results, logs, health problems, hardware info.
Synced trees and tasks are kept on the robot’s disk, so it can also run them
when it is offline (see ROS 2 topics).
The dashboard at xparo.in. The website you use in your browser to design behaviour, start tasks, watch robots live and look back at everything they reported.
The robot always opens the connection to the server, never the other way round. That is why a robot behind a home or office router works without port forwarding.
The ideas you need
- Project
The home for one robot fleet. A project holds its robots, behaviour trees, tasks, everything the robots report, its team members and its public website. You can have several projects, for example one per customer or per robot type. Each project has a project ID (a UUID such as
b6a6e398-ecbc-4120-a468-b2b1e81b34b3) that robots use to find it.- Secret key
A password that lets a robot join a project. You generate it on the project’s Dashboard page and it is shown only once, so copy it right away. XPARO stores only a hash of it. Keys can be frozen, switched off or deleted at any time; only the project owner can manage them.
- Robot
Any computer running
xparo_roswith your project ID and a secret key. You never add robots by hand: a robot appears in the project the first time it connects. It is identified by a device ID thatxparo_rosderives from the machine’s MAC address, so restarting the robot does not create a duplicate.- Robot credential
On that first connection the server gives the robot its own credential, which
xparo_rossaves on the robot and uses from then on instead of the secret key. Switching off a secret key therefore stops new robots from joining but does not disconnect robots that already have a credential.- Online and offline
A connected robot sends a heartbeat every 30 seconds. The dashboard shows it online while the last heartbeat is less than 90 seconds old, so one missed heartbeat is tolerated.
- Behaviour tree
A flowchart of decisions, made of small blocks called nodes: actions (
Wait,SpeakText,NavigateTo), conditions (CheckBatteryLevel), and control nodes such asSequence(“do these in order, stop at the first failure”) andFallback(“try these in order, stop at the first success”). You build trees visually on the Behaviour page. They are stored as BehaviorTree.CPP v4 XML, the same format Groot2 uses. Values written in curly braces, like{destination}, are blackboard variables: inputs filled in when the tree runs.- Task
A behaviour tree made runnable. On the Tasks page you pick a tree, say where each of its variables gets its value, choose which robot(s) run it, and set its stage, time limit and retry rules. A tree on its own never runs; a task does.
- Stage
Every task has a stage:
development,testing,revieworproduction. Every robot is started with anxparo_stage(defaultproduction). A robot only runs tasks at its own stage or a later one:Robot started with
Runs tasks whose stage is
xparo_stage:=developmentdevelopment, testing, review, production
xparo_stage:=testingtesting, review, production
xparo_stage:=reviewreview, production
xparo_stage:=production(default)production only
New tasks start in development, so a robot started with the default stage refuses them until you promote the task or start the robot with
xparo_stage:=development. This is the most common surprise for new users; see Troubleshooting.- Run and result
Each time a task runs on a robot is a run, with its own run ID. The robot streams the state of every node while the tree runs, so you can watch it on the Behaviour page, and finishes with exactly one result. The result has an outcome (
success,failed,timeout,cancelledand others, see Run results) and a plain-English explanation of what happened.- Database
Everything robots report is stored in the project: task history with full run reports, logs, sensor uploads and ROS bag recordings, AI chat prompts, reports and feedback. You browse it under Database in the sidebar.
How the pages fit together
The dashboard sidebar numbers the main pages in the order you use them:
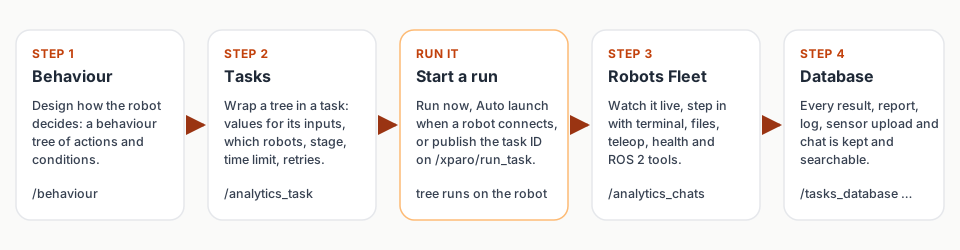
From an idea to a robot doing it.
The Dashboard guide walks through every page.
Team roles
A project can have several members, each with a role:
Role |
Can do |
|---|---|
Owner |
Everything an Editor can do, plus managing secret keys, adding and removing team members, changing roles, and deleting the project. The person who creates a project is its Owner. |
Editor |
Build and edit behaviour trees, files and custom nodes; create, run and cancel tasks; use every remote tool on robots (terminal, files, teleop, reboot, ROS 2 parameters, rosbag, Wi-Fi and Bluetooth); edit the project website and LLM keys. |
Viewer |
Look but not touch: can browse everything, list a robot’s files and watch live status and health. Cannot edit behaviour trees, run or cancel tasks, use the terminal or teleop, upload or delete robot files, reboot, change ROS 2 parameters, control rosbag recording, change Wi-Fi or Bluetooth, or change project settings, the website or LLM keys. |
Credits and storage
Each project has a balance of credits (XP coins); 1 credit = ₹1. A new project starts on the free plan with 5 credits. The first 5 MB of storage is free. Beyond that, storage costs 15 credits per GB per month, charged on the 1st of each month for what is stored on that day. Your balance, usage and the next charge are shown on the Dashboard page, where you can also buy more credits.
The AI assistant
The Ask here…. bar at the bottom of the dashboard, and the chat on the Behaviour page, talk to an AI assistant that knows your project. It can explain nodes, answer questions about a robot’s history, and propose edits to the tree you have open. XPARO does not supply the AI model: add your own key for any OpenAI-compatible chat API (OpenAI, OpenRouter, or a local Ollama, vLLM or LM Studio server) in the LLM API Key Manager on the Dashboard page. Until you add one, the assistant answers “No valid API keys available”.
Glossary
- xparo_ros
The ROS 2 node from the
xparopackage that runs on the robot.- project ID
The UUID of a project. Shown on the Dashboard page as Project Key (websocket routing id) and in the Robots Fleet Add a robot dialog.
- secret key
Lets a new robot join a project. Shown once when generated.
- robot credential
A robot’s own key, issued by the server on its first connection and saved in
config/credential.jsonon the robot.- blackboard
The shared memory of a running tree.
{name}in a node’s attribute reads or writes the blackboard entryname.- dispatch key
The name of a message on the robot connection, for example
RUN_TASKorROBOT_HEARTBEAT. See Message catalogue.- run ID
The ID of one run of a task on one robot.
- xparo_stage
The stage a robot is started with; decides which tasks it accepts.
